Zapier is a tool that allows you to connect thousands of apps to automate tasks and save time. You always save time with FileMaker, what is more obvious than connect Zapier and FileMaker? Make Zaps and let Zapier integrate your emails, tweets, youtube channels, rss, Woocommerce, or any other app you can think of, with your FileMaker database. It is actually rather simple 🙂 And fun!
A Zap is an app in Zapier, you can do a few for free. In Zapier there is something called Webhooks. It is a built-in function you can use to build your own Zap and integrate with other apps through the web. You can send data from FileMaker to a Zap using an incoming webhook and the Insert from URL script step, or let a Zap send data to FileMaker using an outgoing webhook.

In this article I will let a Zap monitor a Gmail account. When an email arrives the Zap will filter the emails using the subject, and send relevant data to a FileMaker database. The database is published on one of our FileMaker Server 17, but in fact Zapier will work with any FileMaker Server starting with version 6!
The Zapier Webhook are going to make a POST request using FileMaker Custom Web Publishing and XML, and insert the email subject, body, and date into a table. Custom Web Publishing and XML is always enabled (when installed of course) for previous versions, but for FileMaker Server 17 you need to make sure it is enabled.
The few steps below is for FileMaker Server 17 only, for previous versions make sure Custom Web Publishing is installed and not turned off.
In version 17 you need to open a terminal window and use the ”fmsadmin” command. First check if XML is enabled by using the command
fmsadmin get cwpconfig
You need to login using your username and password, just as you log in to the admin console in a web browser. If you get a line ”EnableXML = false” you need to enable it. Enter the following command:
fmsadmin set cwpconfig enablexml=true
Once again you need to enter your username and password. You should get the message ”EnableXML = true”.
The next step is to open a web browser and browse to FileMaker Server 17 admin console. Make sure Web Publishing Engine is turned on under the Connectors tab
Regardless of FileMaker version you will need a database published on the server, with at least one table, one layout with the fields you want to populate from Zapier, a privilege set allowed to connect with ”fmxml”, and an user account using the fmxml privilege set.
That’s it!
The next part is to make a Zap and configure it to insert a record in the FileMaker databas.
If you haven’t used Zapier before, you need to make an account at www.zapier.com to get ready to make a Zap. You need to connect to the service you want to use, in my case a Gmail account. You must allow Zapier to read your emails regularly.
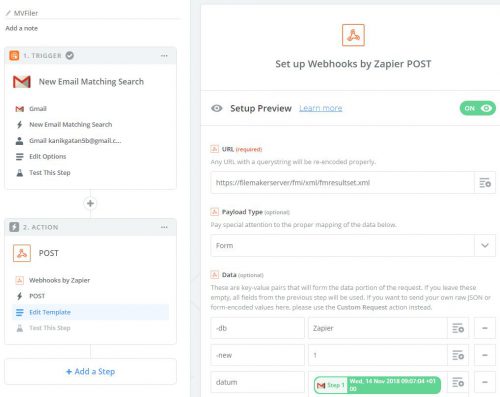
You make your Zap step by step, one Zap can involve several steps. My Zap is only 2 steps. The first step is to let Zapier read my emails. All emails matching a filter is going to step 2. In my case I check the email subject for the string ”mvfiler”.
Note: ”MVFiler” is a file management system we have been using for years, everytime a file is downloaded using our service an email is sent. Zapier reads the email and creates a record in a FileMaker table, which is related to the client downloading the file. The result is a history of all files for each client, valuable for our work.
The first step looks like this in Zapier:

For the next step I use the Webhook in Zapier to POST data. I enter the URL to our FileMaker Server 17 in the URL field:
https://filemakerserver/fmi/xml/fmresultset.xml
As I am using XML I add ”fmi/xml/fmresultset.xml” after the server address (you have to change ”filemakerserver” to your server address). Zapier can send data in different formats, for XML I choose ”Form” as Payload Type. All the data will be sent with key/values in a query string.

I enter my keys as Data. ”-db” is the name of the database, ”-lay” is the name of the layout, and then the field names you want to populate. In my example it is ”datum” (the date), ”subject”, and ”message”. Please note the key names are case sensitive.
You select the values for each of the fields in the menu to the right which shows the result from step 1. To make a new record you must also have a key ”-new” as well. For this key you will need to make an exception to the FileMaker XML grammar and enter ”1” (or anything else I suppose) as the value in order to get it to work. If you don’t enter any value, Zapier will not send the key to FileMaker and you will not get a new record.
The last thing is the Basic Auth, enter your username and password for your ”fmxml” user account you defined in the database, separated by the ”|” delimiter. I have an account ”user” with the password ”pwd123” (isn’t that safe?) and enter ”user|pwd123”.
The Zap is ready to test! If you have done everything right you should get a new record in your database table when running the test.
The last step is to enable the Zap in your Zapier dashboard.
Happy Zapping!

